
Kitchen Remodel: Devonshire Rd.
Completed August 2018
AFTER PHOTOS


We are always happy when our clients' friends want to work with us, and that is doubly so when our clients' parents want to as well... Having recently purchased a home on Devonshire in Ann Arbor Hills to be closer to their kids, our clients want to update their brick ranch kitchen while respecting the mid-century feel of the interior. Please visit this current project work blog often to see the progress and transformation.
March 22, 2018


This is the current kitchen.


The floor plan and the kitchen interior elevation
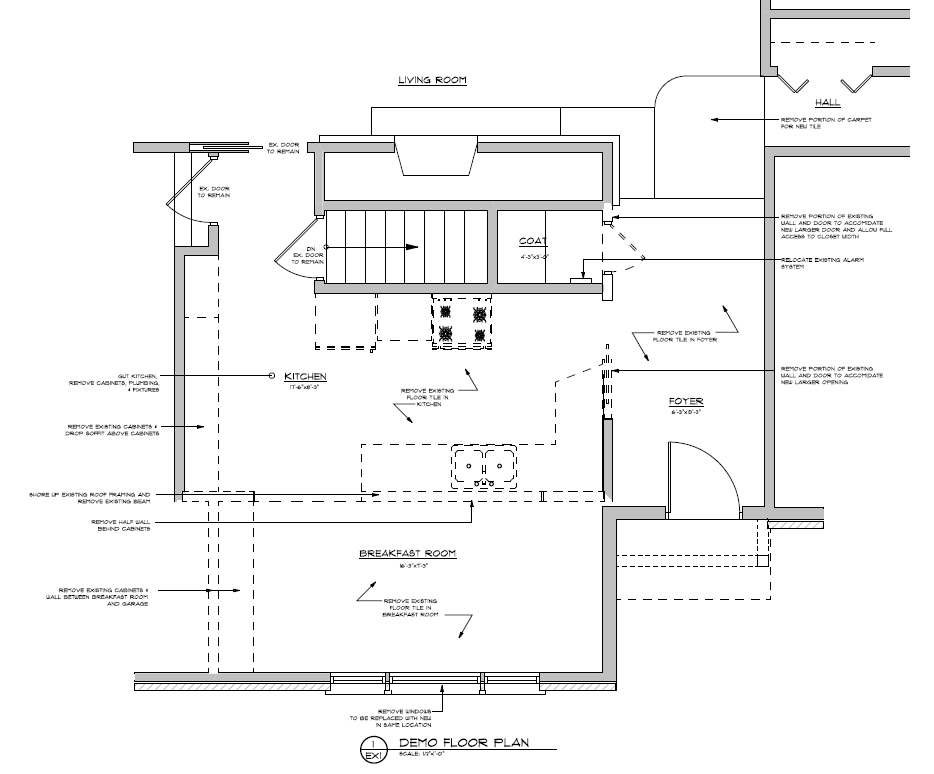

The roof line will also be slightly different. And the demo plan :-)
March 23, 2018
Before demolition can begin we build temporary walls between the construction area and the existing living space to keep the dust contained and add privacy for the homeowners.
The decorative screen between the living room and the library is protected from dust.
Demolition in the kitchen has begun, upper and lower cabinets have been removed.
Additional cabinets flanking the kitchen and breakfast area are being disassembled.
March 28, 2018
Breakfast room cabinets have been removed and drywall in the kitchen is starting to come down.
All of the kitchen cabinets are gone. Next the drywall on all of the walls and ceiling will be removed along with the half wall between the kitchen and the breakfast room.
The demolition recycle trailer has been moved into the driveway where discarded material will be removed through the garage and disposed of.
Appliances that were in the kitchen have been donated and/ or recycled. For now the floor tile will remain in place to keep the demolition debris from falling into the finished basement.
Tile in the breakfast area has been removed and the floor will soon be framed up to the same level as the kitchen, eliminating the step.
April 5, 2018
The configuration of the kitchen and breakfast room walls is changing to one straight wall at the garage to allow for kitchen cabinets and a cleaner overall look. The wood drop beam will be removed and replaced with a steel beam pushed up into the ceiling allowing for one continuous ceiling height.
All of the drywall has been removed in the existing kitchen and the ceiling is lined with plastic to keep the blown in insulation from falling from the attic into the work space.
The existing pocket door between the kitchen and Foyer will be moved and enlarged.
The next step is to shore up the existing ceiling so load bearing walls and beams can be removed to clear space for re-positioned beams and walls to open up the space.
April 12, 2018
This photos shows the wall between the garage and existing kitchen/dining. Plaster on both sides has been removed and a footing has been dug for the new steel post and beam location. This will allow the kitchen ceiling height to all be the same.
A new wall is being constructed in the garage so the kitchen and dining area can be increased. Once the new wall has been constructed the old wall can be removed.
The existing rafters have been notched (also known as a birds mouth) to receive the new steel beam.
Mike and Brian lift the new steel beam into place.
The beam has been lifted and placed to support the existing rafters in a new location. There is still fine tuning of the beams location to slowly engage the beam fully with the existing rafters to carry all the load. Once the weather improved we can remove the flat roof ant the existing dining area.
April 18, 2018


The ceiling is too low in the dining room and didn’t match the ceiling height in the kitchen, so we’re about to change the roof line…


We’re raising the ceiling by replacing the flat roof with a hip roof.


The challenge is to maintain the style of the roof and so we’re blending it in with the existing angles.
And all of this while having waaaay too much fun with our drone :-)
April 25, 2018


The roof structure has been completed and now the entire front of the house will be re-roofed. The roofing crew will make quick work of it.
New, thicker roof sheathing is installed


The roof sheathing installation on the front of the house is complete. Hips and valleys at the new roof structure is flashed & water proofed before the roofing is installed


Roofing on the front of the house has been completely installed after 1 day and blends nicely with the existing roofing on the back of the house.
May 2, 2018


This closet will become space for compact front loading washer and dryer.
If you look carefully you can see yellow string hanging from the ceiling. These are the locations for the kitchen island pendants. We also place post-it notes on the walls to identify where outlets and switches go.
May 10, 2018
Insulation is stockpiled in the center of the new space awaiting installation in the ceiling.
Insulation baffles have been put in place to allow for air flow in the attic space even when copious amounts of insulation have been added.
At eave conditions it is difficult to properly insulate with batt insulation so foam insulation is used instead that can flow into all the cracks and crevices allowing for a tighter seal and reducing air infiltration into the living space.
May 17, 2018
Installation of drywall is starting.
The ceiling boards will be attached first and then the walls to follow.
The ceiling and walls have been dry walled and the first coat of mud / joint compound has been added
Over the next few days the taped and mudded joints will be sanded and another coat added until all joints are smooth.
May 30, 2018
The drywall in the kitchen & dining area has a fresh coat of paint!
Next the sub-floor will be laid and tile will be installed.
The wall between the Kitchen and the Garage has also been sanded and painted.
Then only thing left in the garage is a new epoxy coating on the floor.
June 5, 2018
The underlayment has been installed and the joints are taped.
This creates a smooth strong surface for the tile
Tile in the Kitchen and Dining area is starting to be laid. The red colored dots on the floor are small plastic spacers that also allow the installer to adjust the height of the tile at each joint. Although from afar it reminds me of rose petals...
The tile pattern in the foyer is started from the center to make sure it aligns with the door as you enter.
The pattern in the entry foyer is extended into the kitchen verifying the alignment is correct.
The tile courses in the kitchen and dining are progressing. The plywood box in the center of the room is where the island plumbing is, the box was added to protect the plumbing during construction.
June 13, 2018
The tile in the foyer has all been laid, the next step will be grouting the joints
The kitchen and dining floor tile is also installed and will be grouted next.
This image shows the foyer tile complete, with the matching grout floated in and the tile surface cleaned. Next the kitchen cabinets will be delivered and installed.
June 27, 2018
Custom kitchen cabinets have arrived and are being staged to begin installation. The doors are a solid maple with a pillow top edge profile and a custom stain.
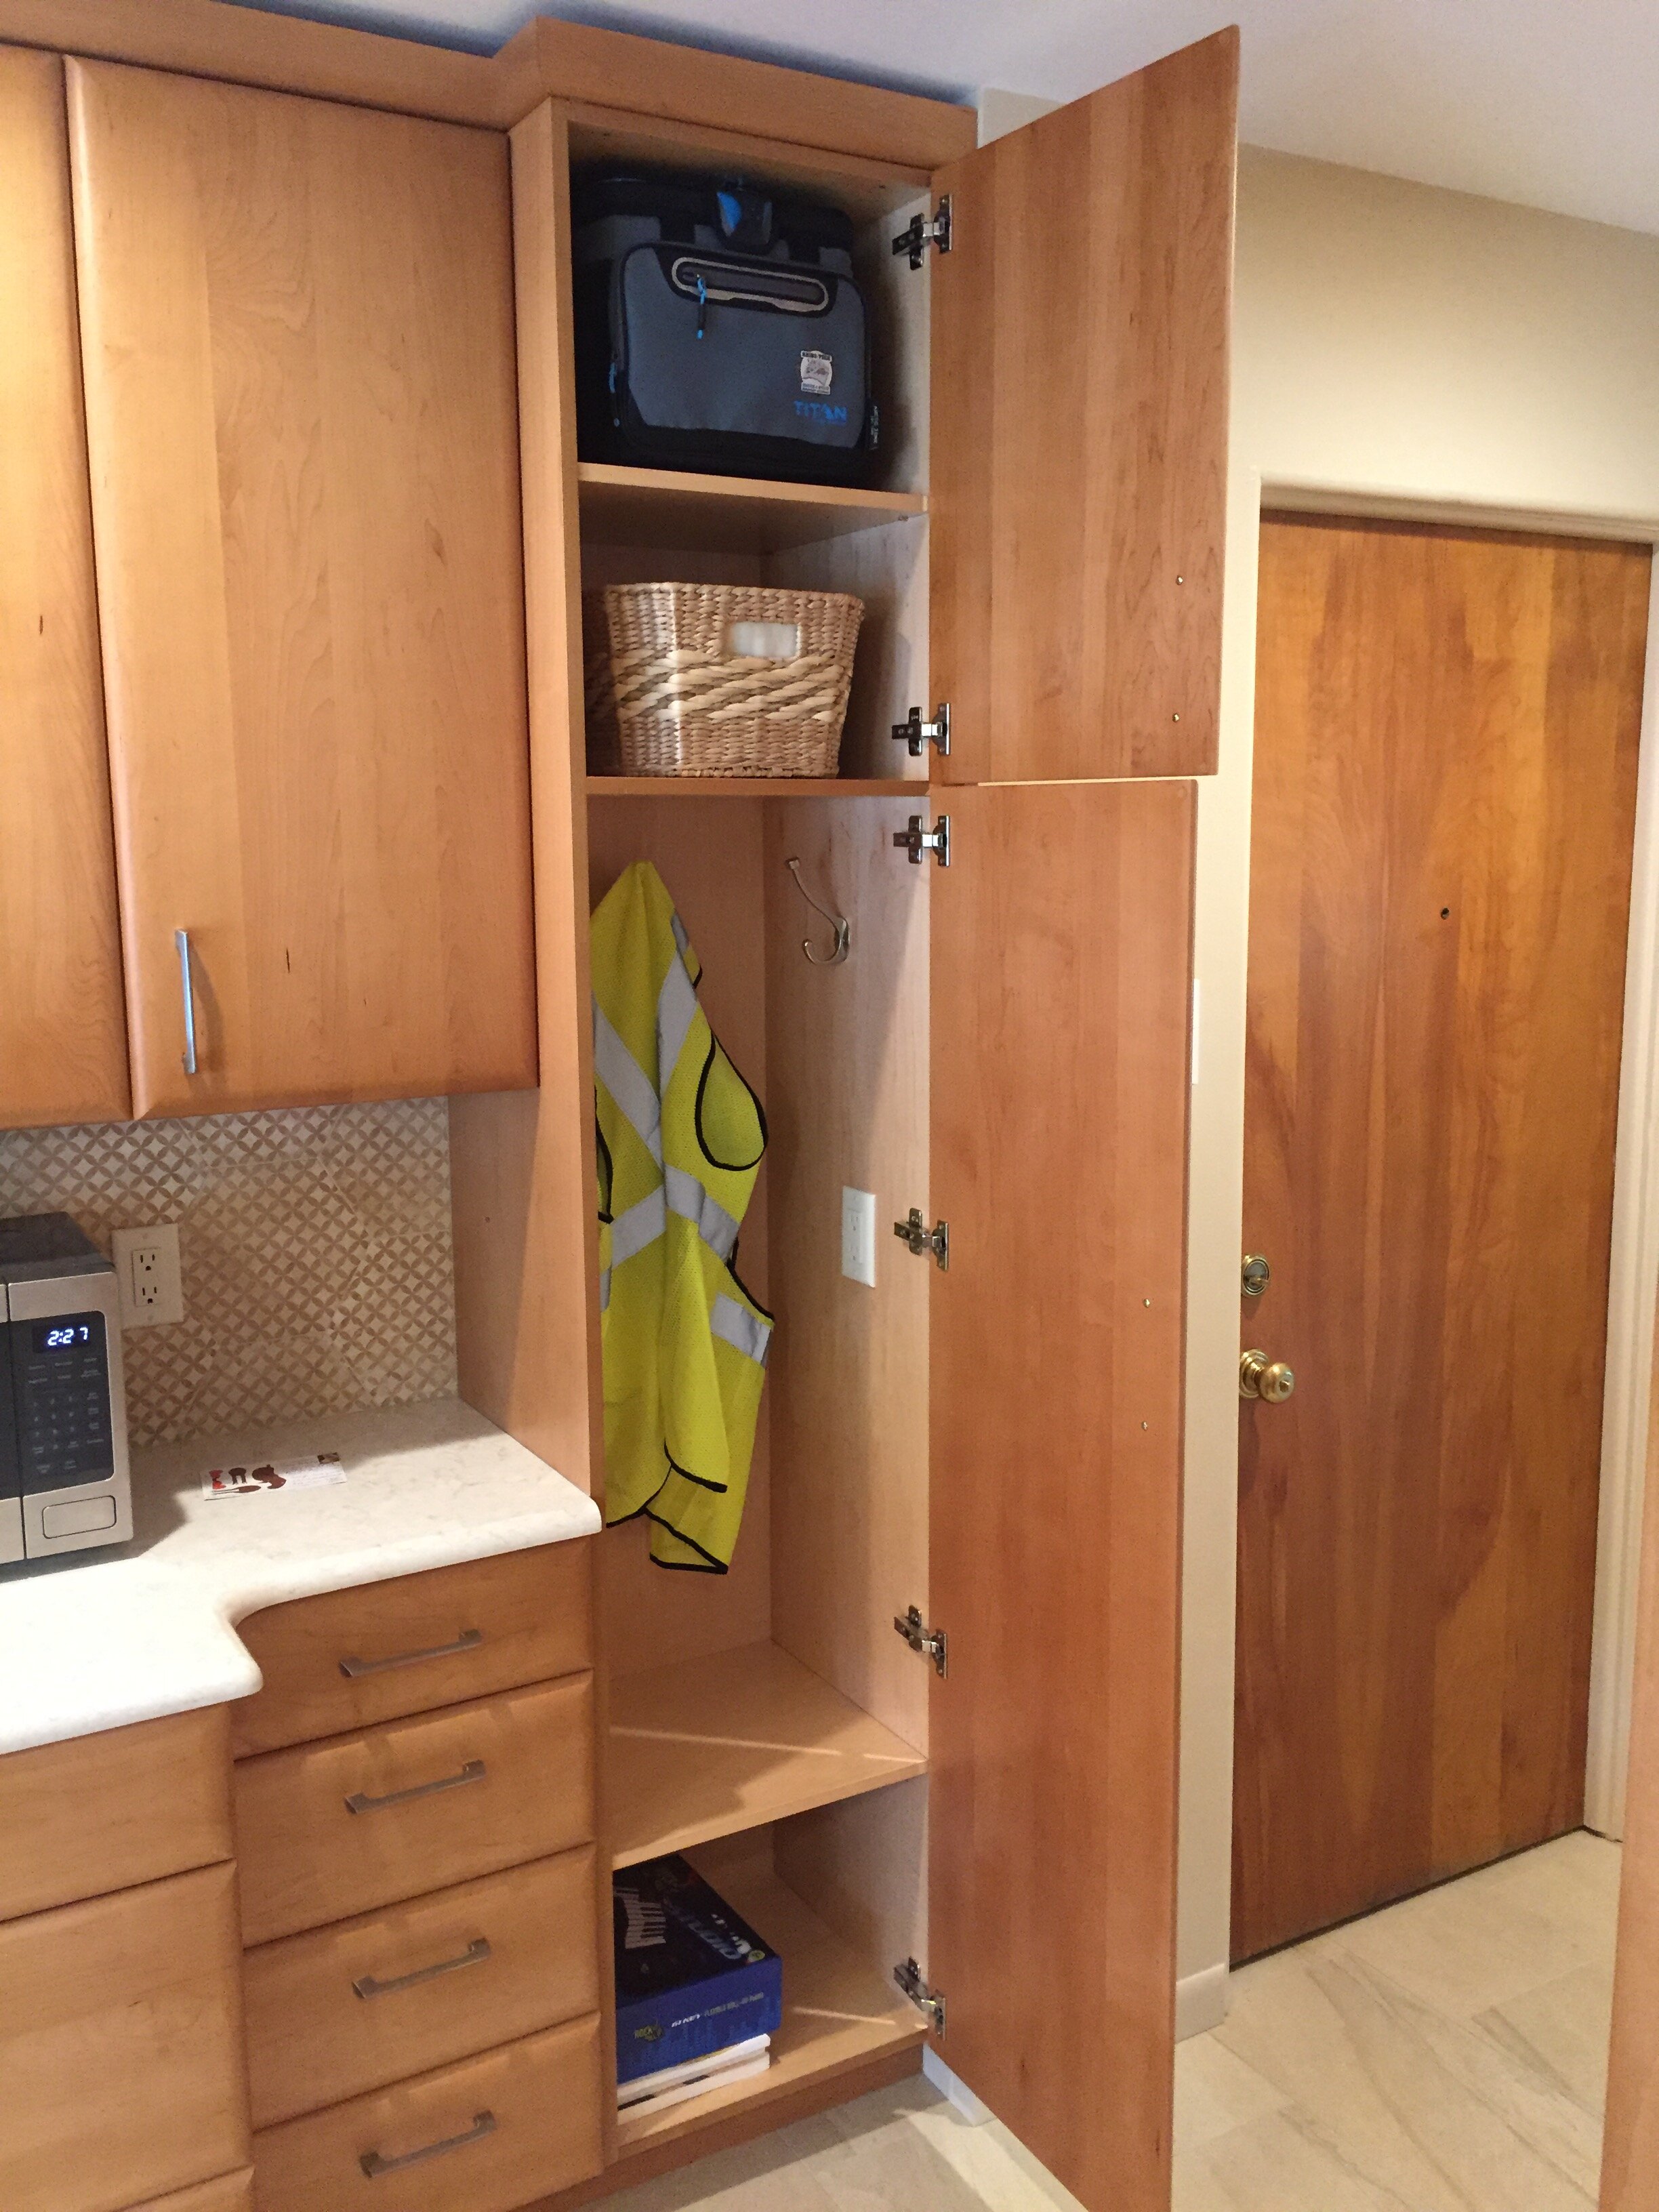
Lower cabinet along the range wall are starting to be installed in addition to a tall cabinet that will function as a compact coat closet for easy access on the way to the garage. This cabinet run will also include a drop zone for keys and storage space for essential office supplies.
This wall of storage cabinets and counter space will have a dual function of kitchen/ dining storage and a counter for buffet style serving. To the left of the photo you can see the back side of the island cabinets for additional storage.
This section of the range wall cabinets show a jog in counter depth where the prep counter returns back to a shallow counter for keys and items brought in from the garage adjacent to the tall coat closet. This photo shows the “pillow top” door and drawer front profile.
The sleek curved edge style is called pillow top.
July 5, 2018
A mock layout of the back splash tile is put together to ensure alignment and outlet locations.
This is a view from the foyer of the back splash mockup on the floor.
The hex backsplash tiles have been mortared into place and clips are still in place to hold the spacing until the mortar dries. Next the tiles will be grouted.
July 12, 2018
The backsplash tiles have been installed and grouted.
The installer is calking the joint where the backsplash meets the counter.


These photos show the hex backsplash tile installed at the buffet counter.
The grout choice blends the tiles together but the shape can still be seen.
Appliances have been installed and tile is in.
Next the painter will come back and touch up the paint throughout the room.
The island skin and faucet have been installed. Two soap dispensers have been installed, one for dish soap and the other for hand soap. The button to the far right operates the disposer.
The buffet counter and storage area is complete.
July 20, 2018
The kitchen is complete, everything is installed and ready for the client.
This kitchen blends well with the rest of the house décor and should lend itself to a timeless design.
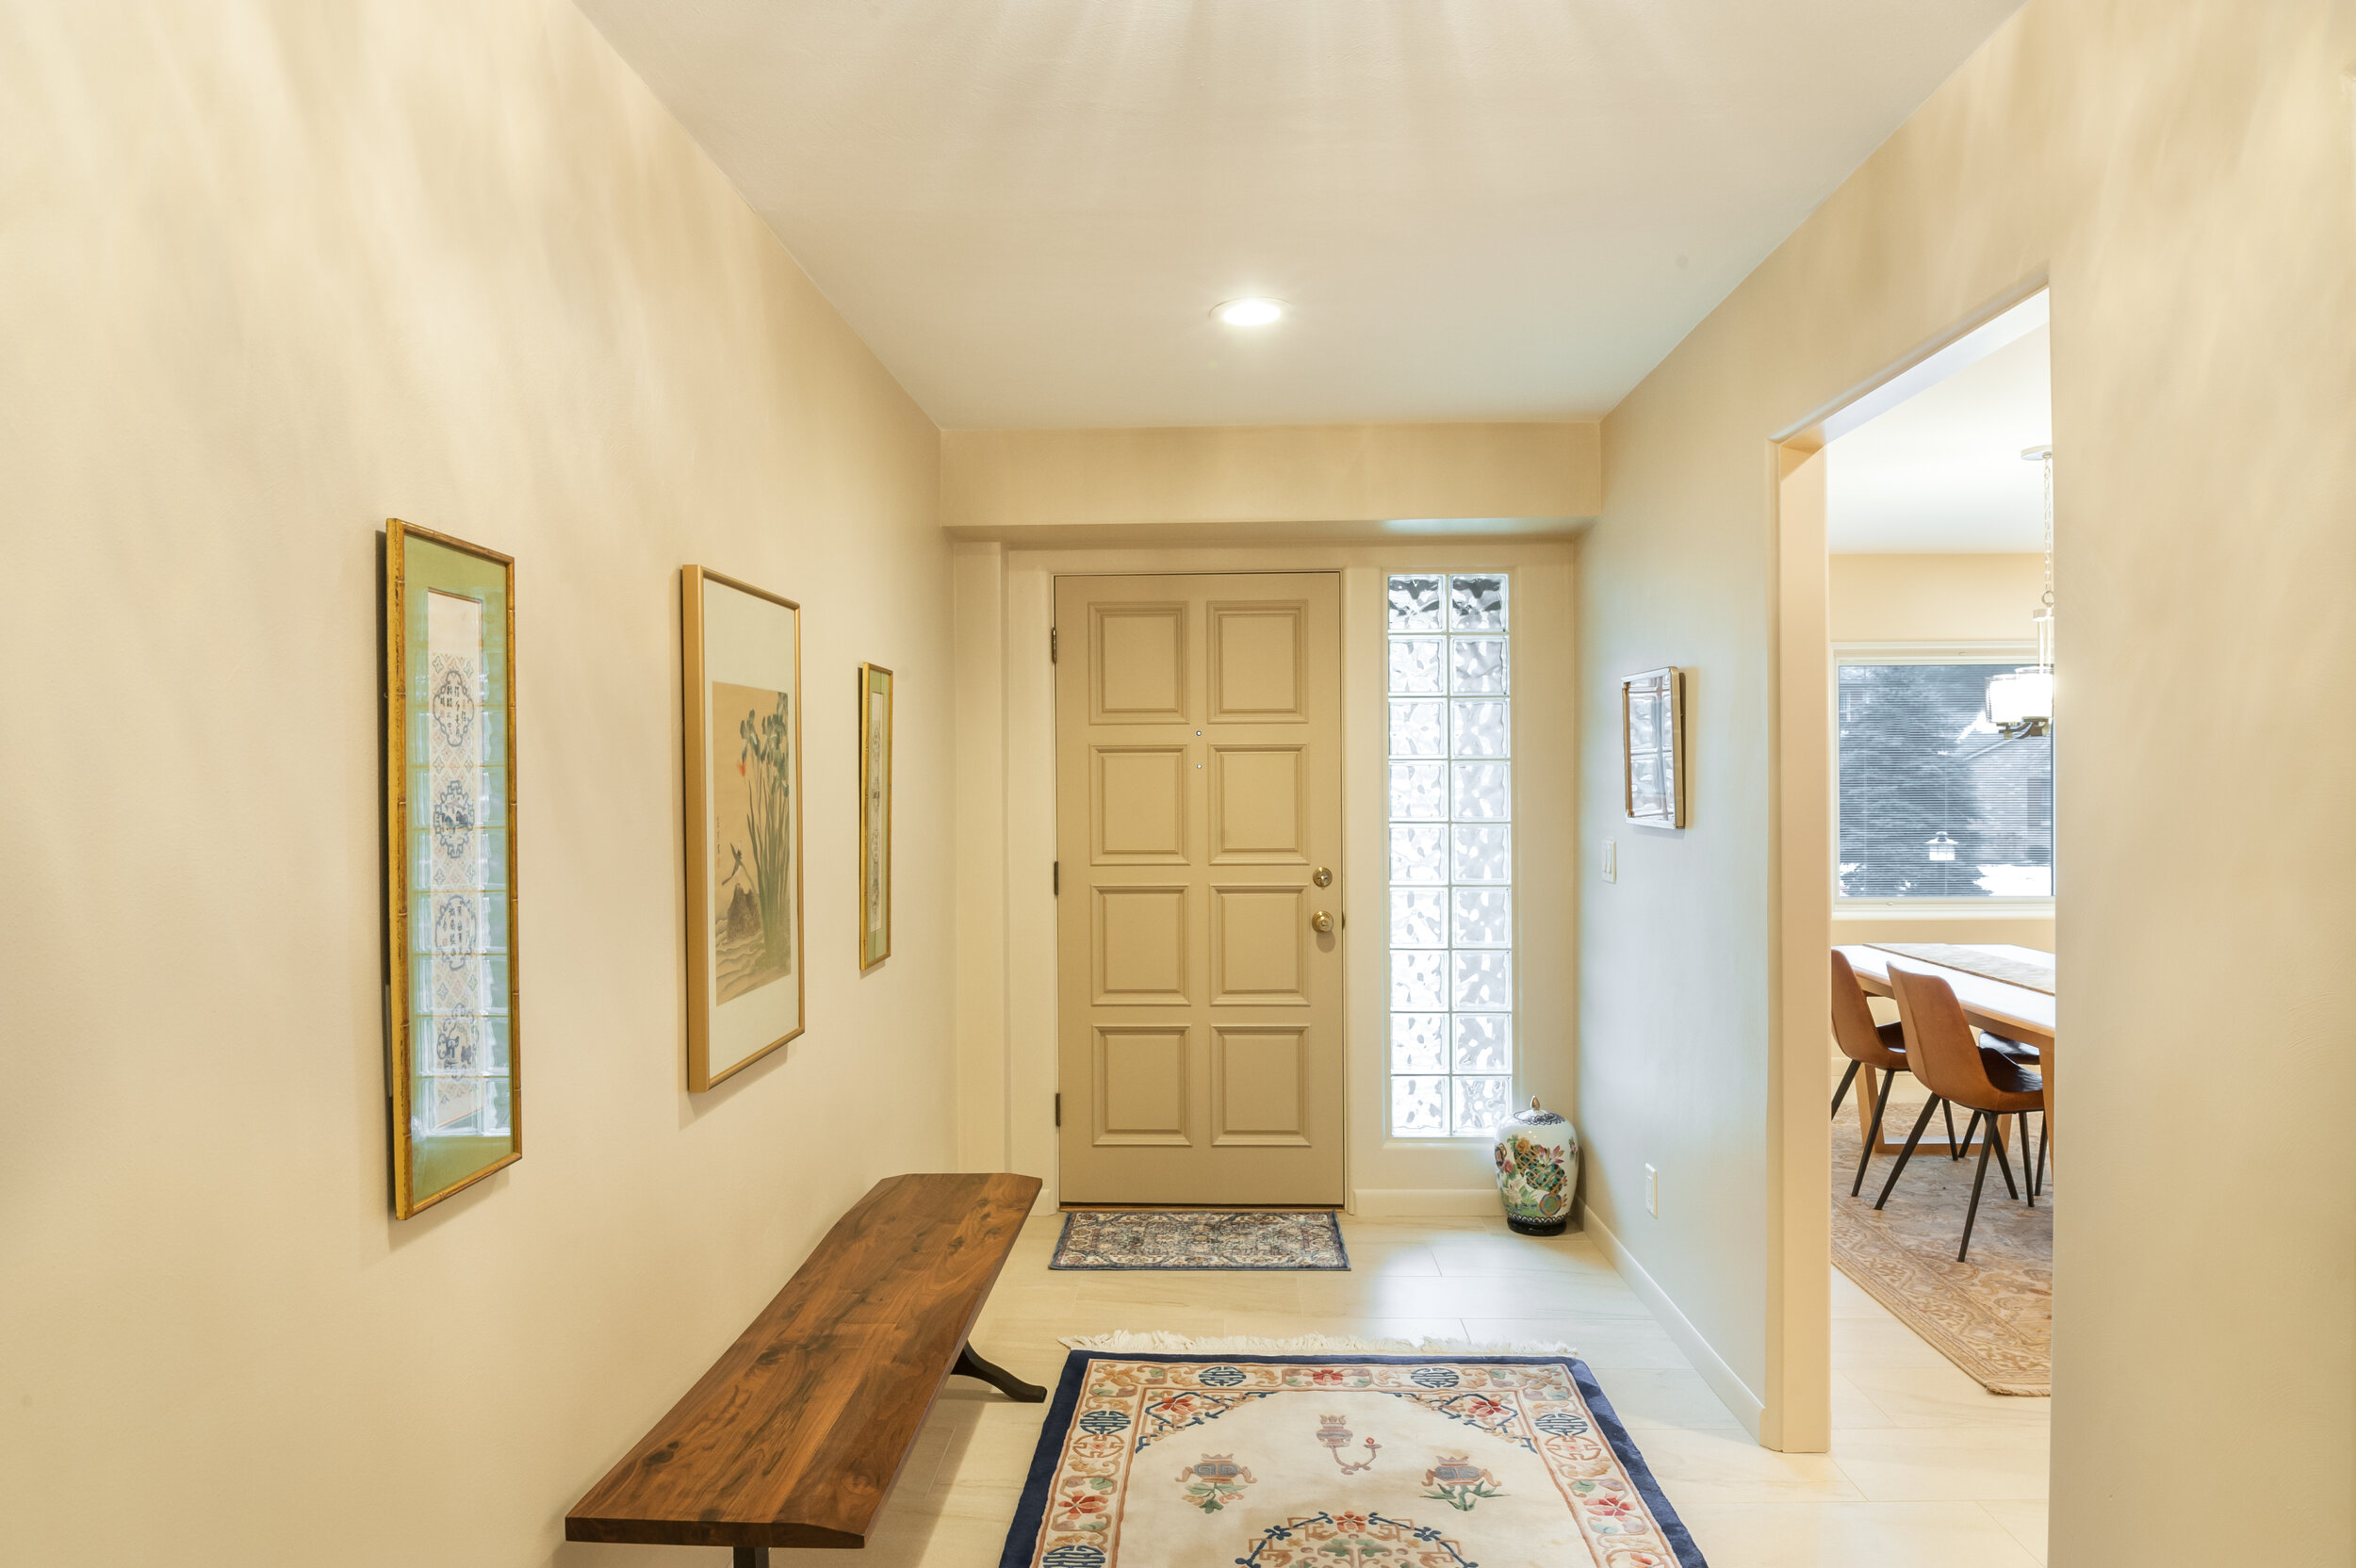
The entry way has been updated with a new tile floor that continues into the kitchen. The door color was freshened up with a lighter shade.
This a view of the completed kitchen from the Foyer.
Soon the custom dining table will be completed and delivered.


